Securing Your Supply Chain: A Guide to Signing and Verifying Blobs
Y
Backend Engineer 🚀 Cloud Native Enthusiast ☁
Search for a command to run...
Backend Engineer 🚀 Cloud Native Enthusiast ☁
No comments yet. Be the first to comment.
vLLM is a workhorse to run inference for any LLM under the sun. One of the recent developments in the project is the ability to define thinking_token_budget, basically a request level argument that ca
In a common workflow we create a virtual environment using different tools inside of the project directory. You might have venv, .venv, env and so on. I find it a bit cluttered. My approach is a bit d
Learn how to build your own powerful Large Language Model (LLM) application that can search the web, extract information, and answer your questions – all LOCALLY! In this tutorial, I'll walk you through the process of creating a web-searching LLM fro...

Large Language Models are great at generating code, but we need to go an extra mile to run them; well not any more. In this video, we will be building our application that can use both local and hosted large language models (Gemini, ChatGPT, and so o...

Having a private PyPI repository can be beneficial in many ways. We can host our internal private packages; from security perspective, it can be a controlled environment for public packages from where all the dependencies are installed in our project...
Signing artifacts should be a crucial part of our workflow. As a part of Supply Chain Security, we must ensure that the artifact built on our CI platform is the artifact we are deploying on our production environments.
If by any means, we cannot verify that the artifact built is not the artifact we are going to deploy then it’s a RED flag and we might be likely compromised. In this walkthrough, we are going to look at how we can use components of Project Sigstore: Cosign, Flucio, and Rekor - to sign and verify our artifacts.
This guide is mostly focused on Binary Large Objects (Blob) and does not cover workflows related to Containers.
We produce different types of artifacts on our build system, which can range from container images, zip files, log records, SBOMs and many more depending on the use case. These artifacts can be business essential and when tampered with will disrupt our businesses.
The process of verifying the artifacts that happen in 3 main high-level steps:
Signing the artifact ✍️
Storing the artifact and signature 📦
Verifying the artifact ✅
Sigstore offers us two ways of signing any artifact:
using a public-private key (asymmetric encryption)
using keyless mode (recommended) ✨
This mechanism is something we have been using for ages. We sign our data using Private Key and verify the signature using the Public Key.
With cosign we can generate public-private key pair secured with a password.
cosign generate-key-pair
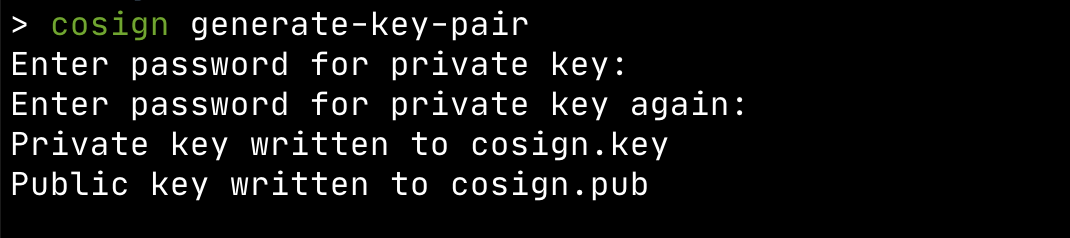
This will generate a public key: cosign.pub and a private key cosign.key.
Now using this private key, let’s sign our artifact. For this demo, I have created a zip file called artifact.zip where I have kept an arbitrary README file. You can do the same with a zip file or any file of your preference.
cosign sign-blob --key cosign.key

# OR
# we can also store our public key and signature as a bundle using:
cosign sign-blob --key cosign.key --bundle cosign.bundle
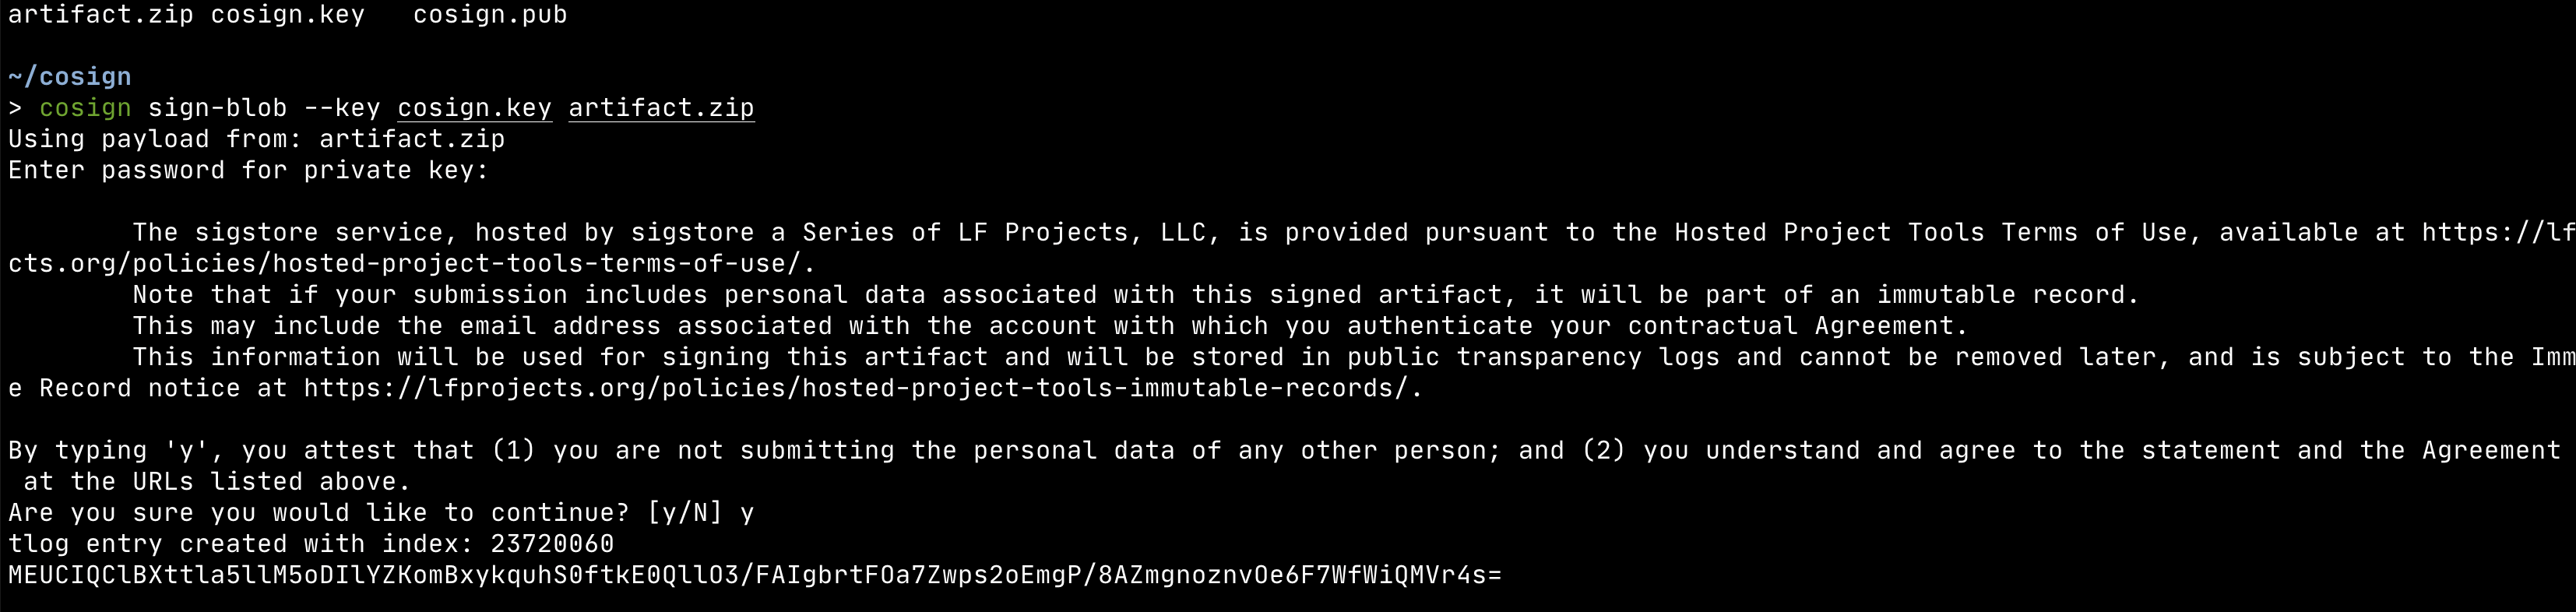
We just finished signing our artifact but a few things have happened in the background.
Cosign signed generated a SHA256 hash of our artifact and created a signature by signing it
then it uploaded the public key and the signature to the transparency log Rekor and returned its index
Rekor is a public infrastructure that logs the public key and signature of all the data signed using cosign.
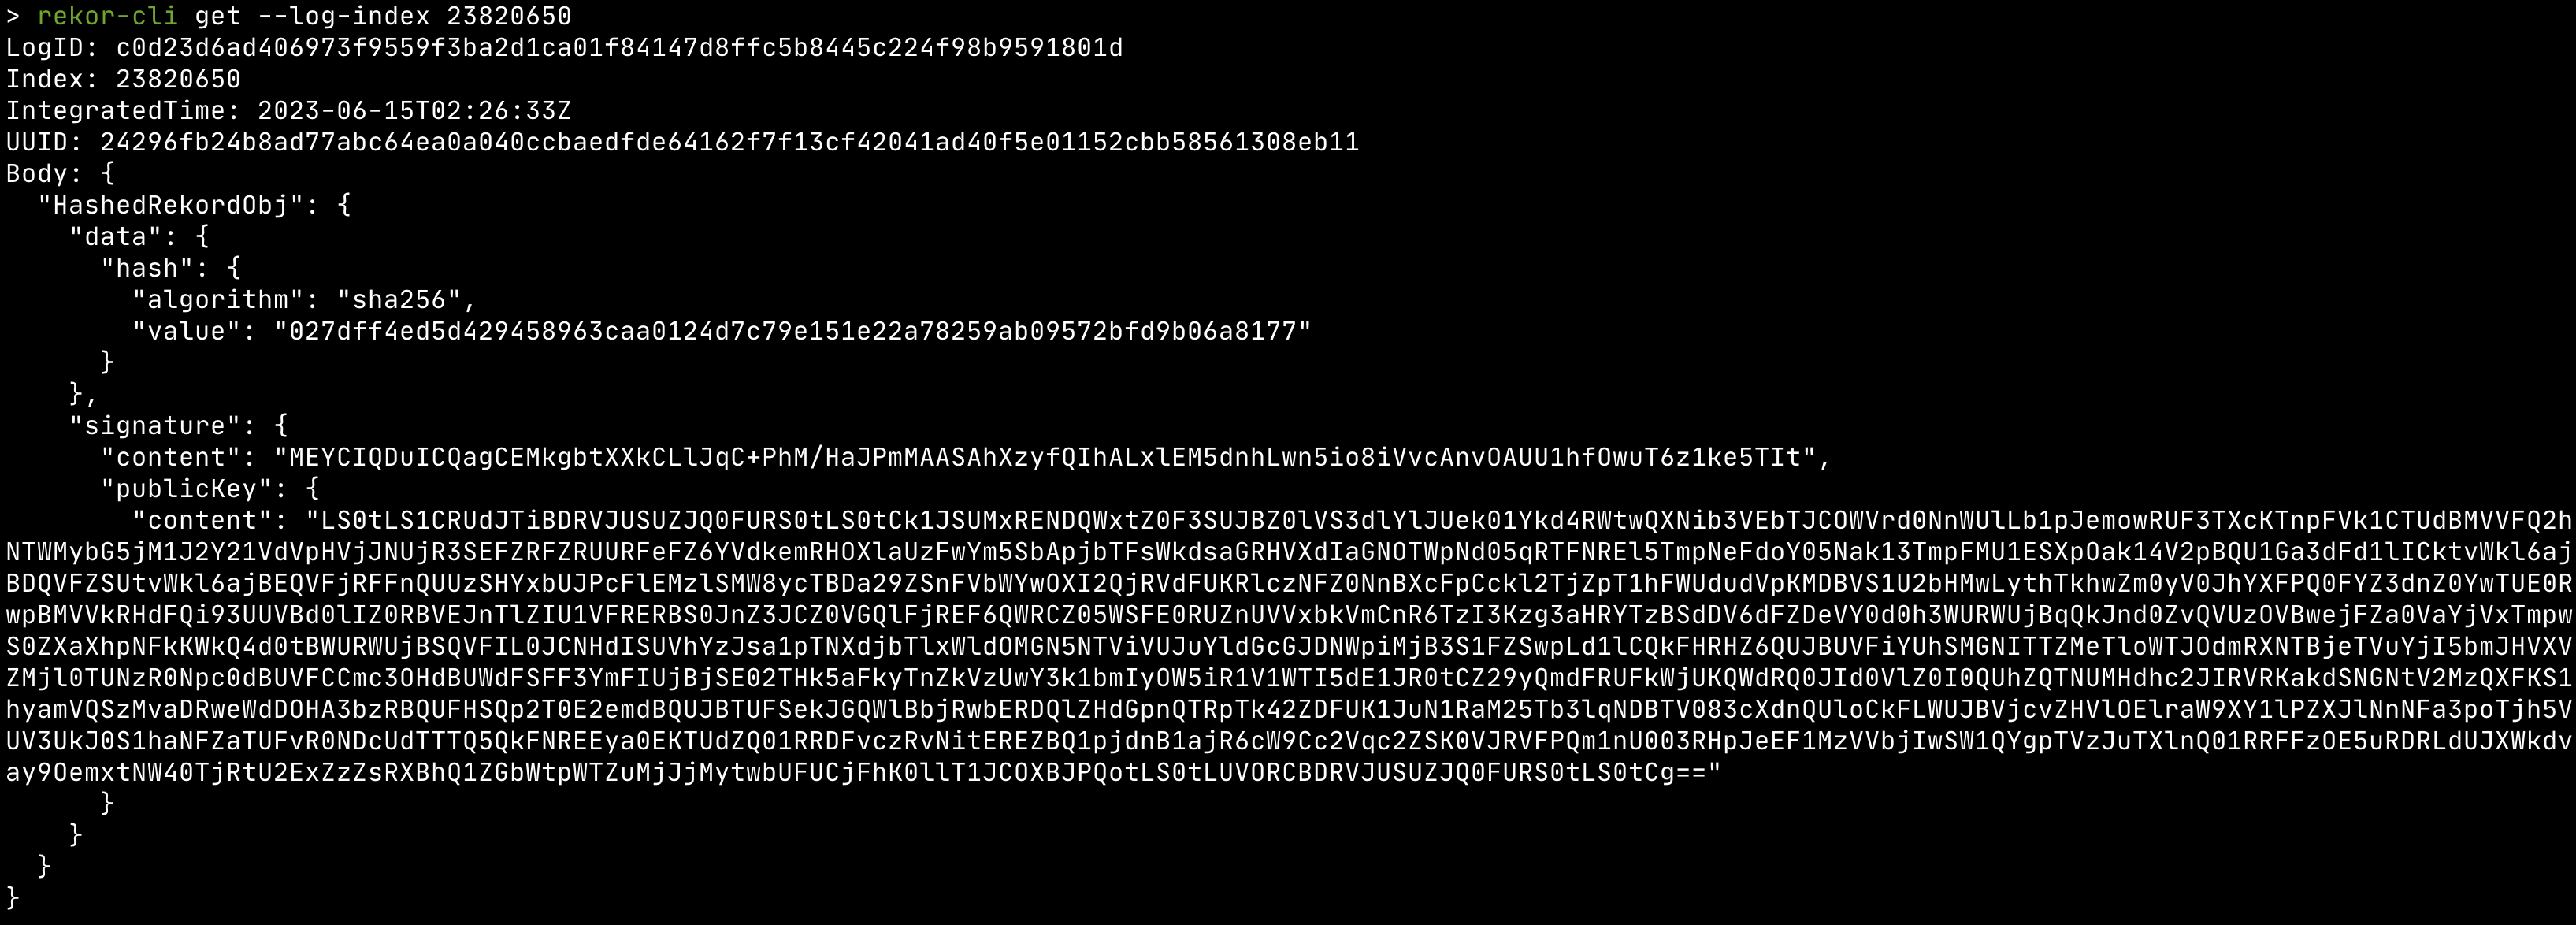
We get the index of the log entry on the Rekor after signing the artifact which is provided as: tlog entry created with index. We can view the Rekor log for our artifact using the rekor-cli.
rekor-cli get --log-index <rekor-log-index>
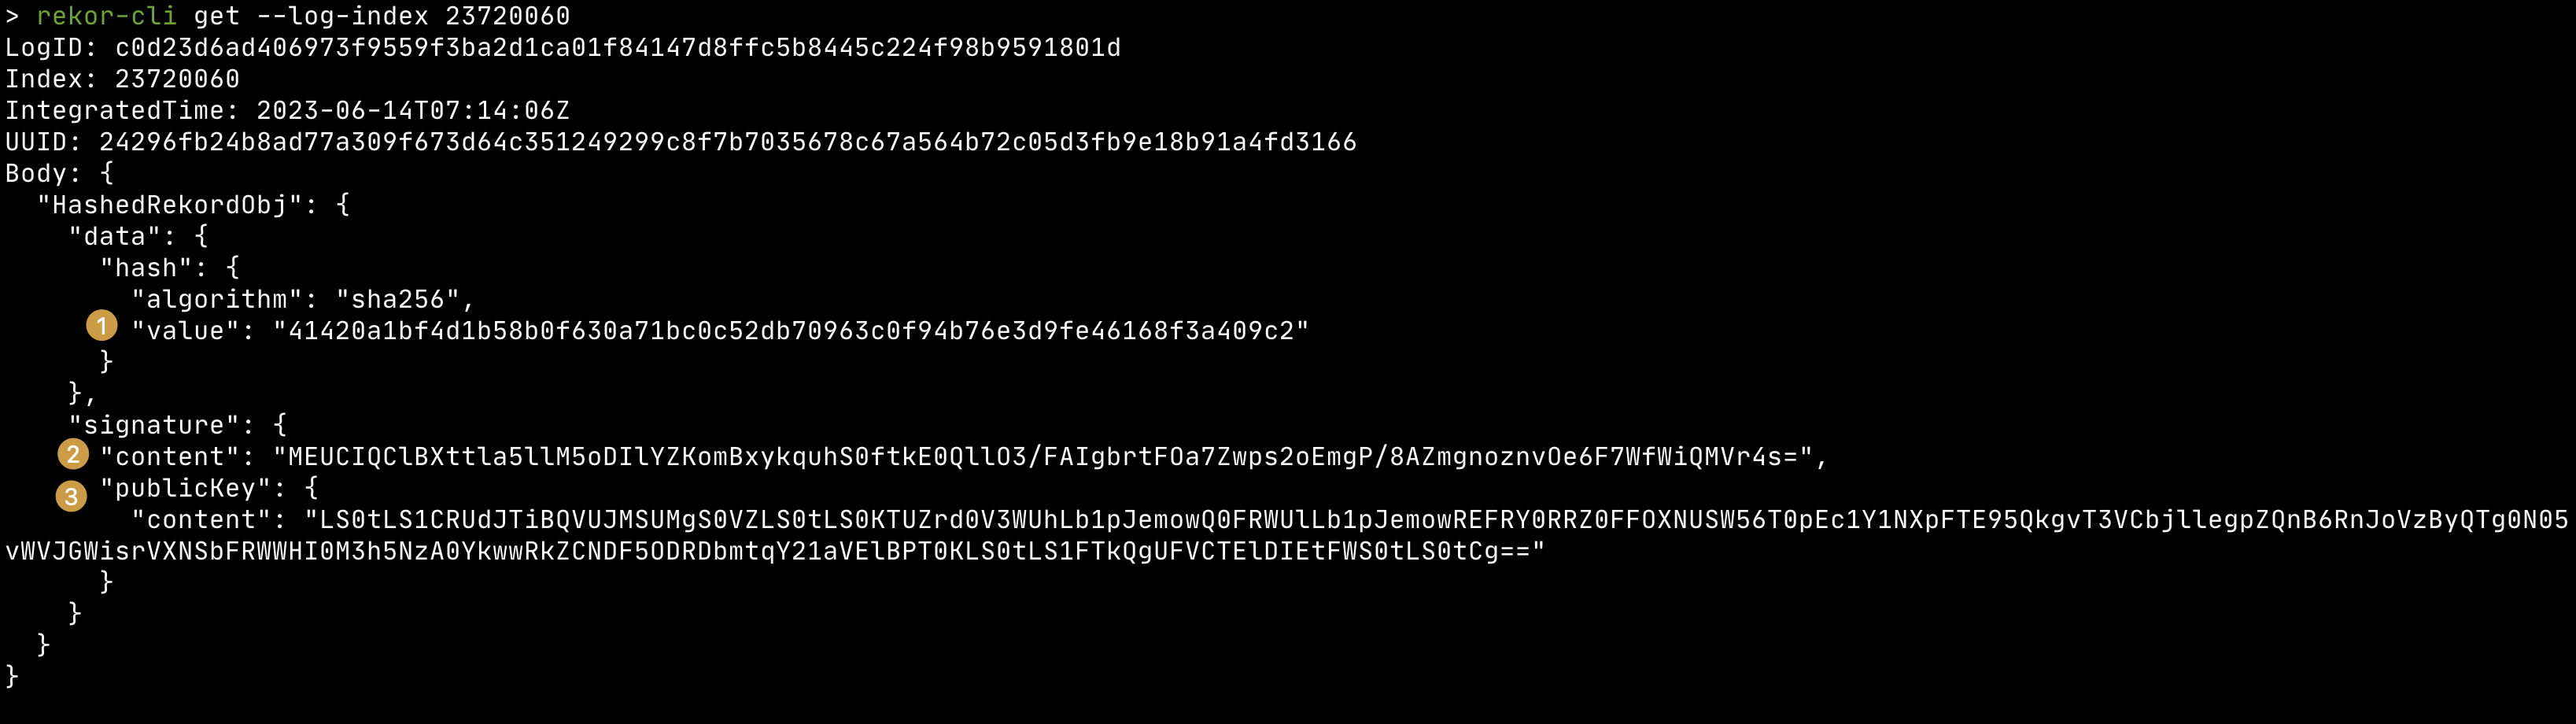
Let's look at this result in depth (numbers co-relate to the image above ):
The SHA256 sum of our artifact.zip file, we can verify this using:
shasum -a 256 artifact.zip

Inside signature > content we have the same signature generated after signing the SHA of our artifact.
rekor-cli get --log-index <log-index> --format json | jq -r .Body.HashedRekordObj.data.hash.value
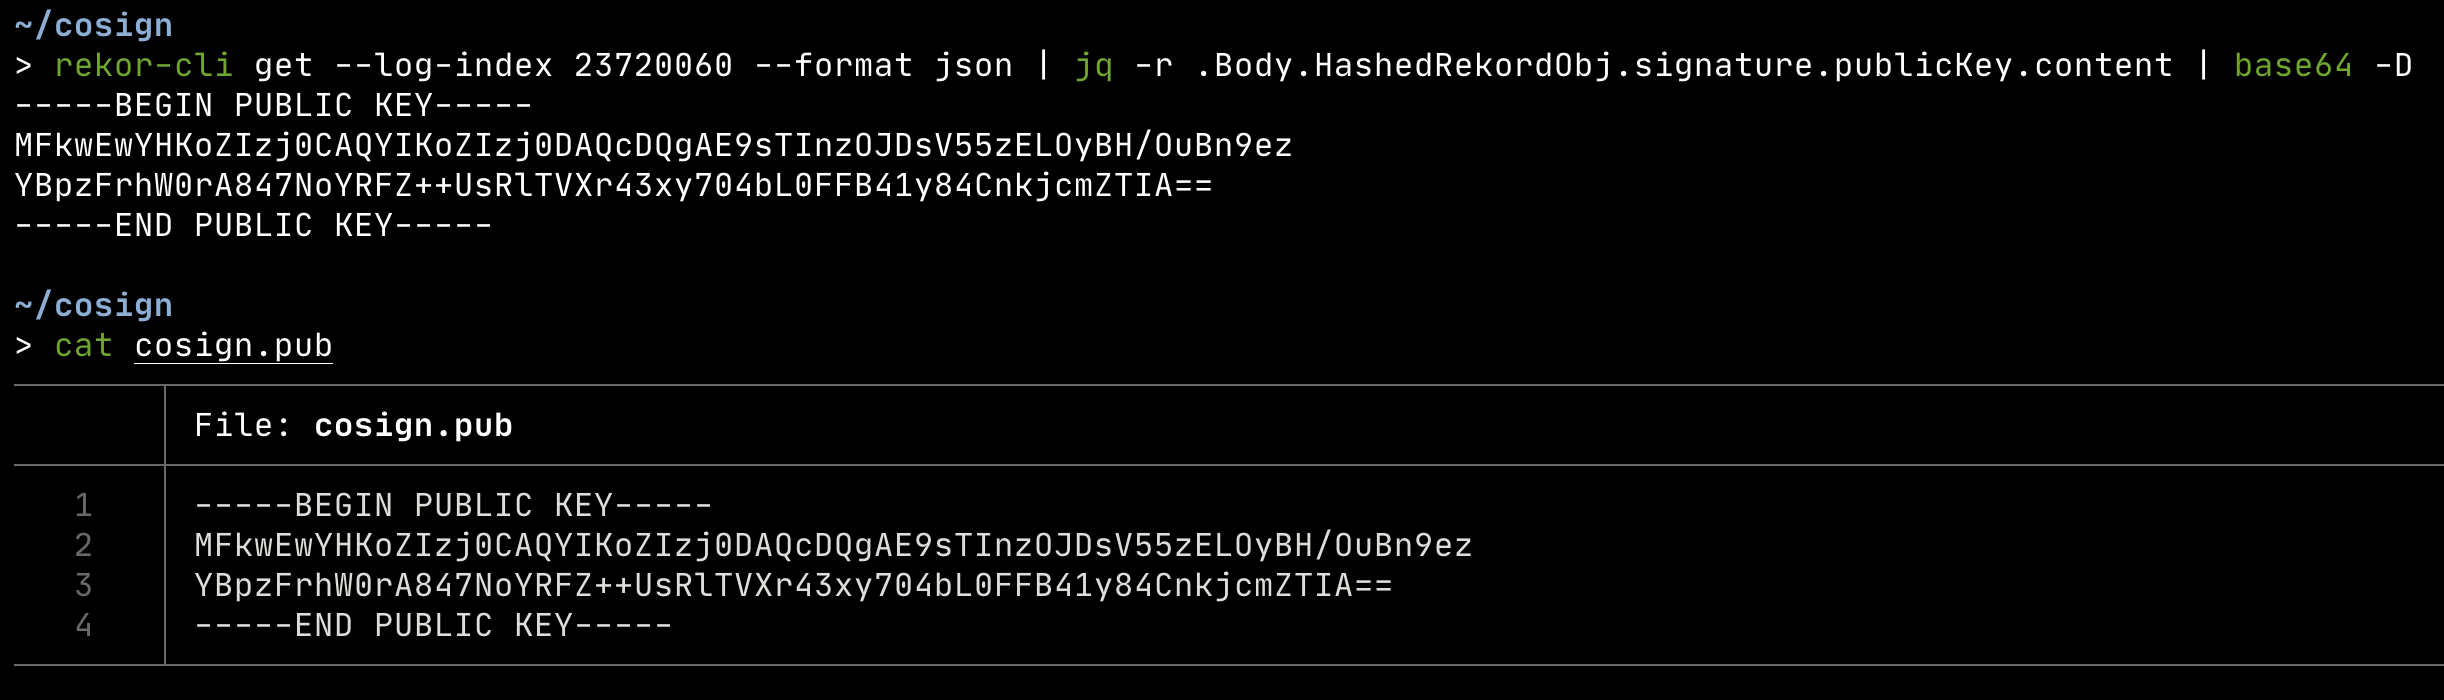
Our public key that was generated when we ran cosign generate-key-pair. It is base64 encoded right now, if we decode it, we’ll get the contents of our public key aka cosign.pub
rekor-cli get --log-index <rekor-log-id> --format json | jq -r .Body.HashedRekordObj.signature.publicKey.content | base64 -D
We’ll need the signature to verify our artifact. We can get it from the Rekor log and store it on a file called cosign.sig.
rekor-cli get --log-index <rekor-log-id> --format json | jq -r .Body.HashedRekordObj.signature.content > cosign.sig
Now let’s verify our artifact! ⚡
We will be using our public key and signature for this.
cosign verify-blob --key cosign.pub artifact.zip --signature cosign.sig  artifact.zip

# If you generated cosign.bundle when signing the artifact, you can use that bundle to verify the artifact

cosign-verify-blob --bundle cosign.bundle artifact.zip

We’ll get the message of “Verified OK”. If our public key didn’t match or the signature didn’t match, then we’ll get an error.
Congratulations, we have successfully signed an artifact and verified it 🎉.
In real world scenario, we’ll be signing the artifact and storing it somewhere, and at the time of dispatching/deployment/usage, we’ll make sure it is verified and only then make the intended use of it. This ensures that our artifact has not been tampered and it’s safe for our workflow/workload.
Keyless mode is a convenient feature that hugely reduces the friction in artifact signing. When we use Public-Private keys, there’s this hassle of managing the keys, and keeping them safe. With keyless mode, we don’t have the overhead of managing any Private keys at all. It is all managed for us!
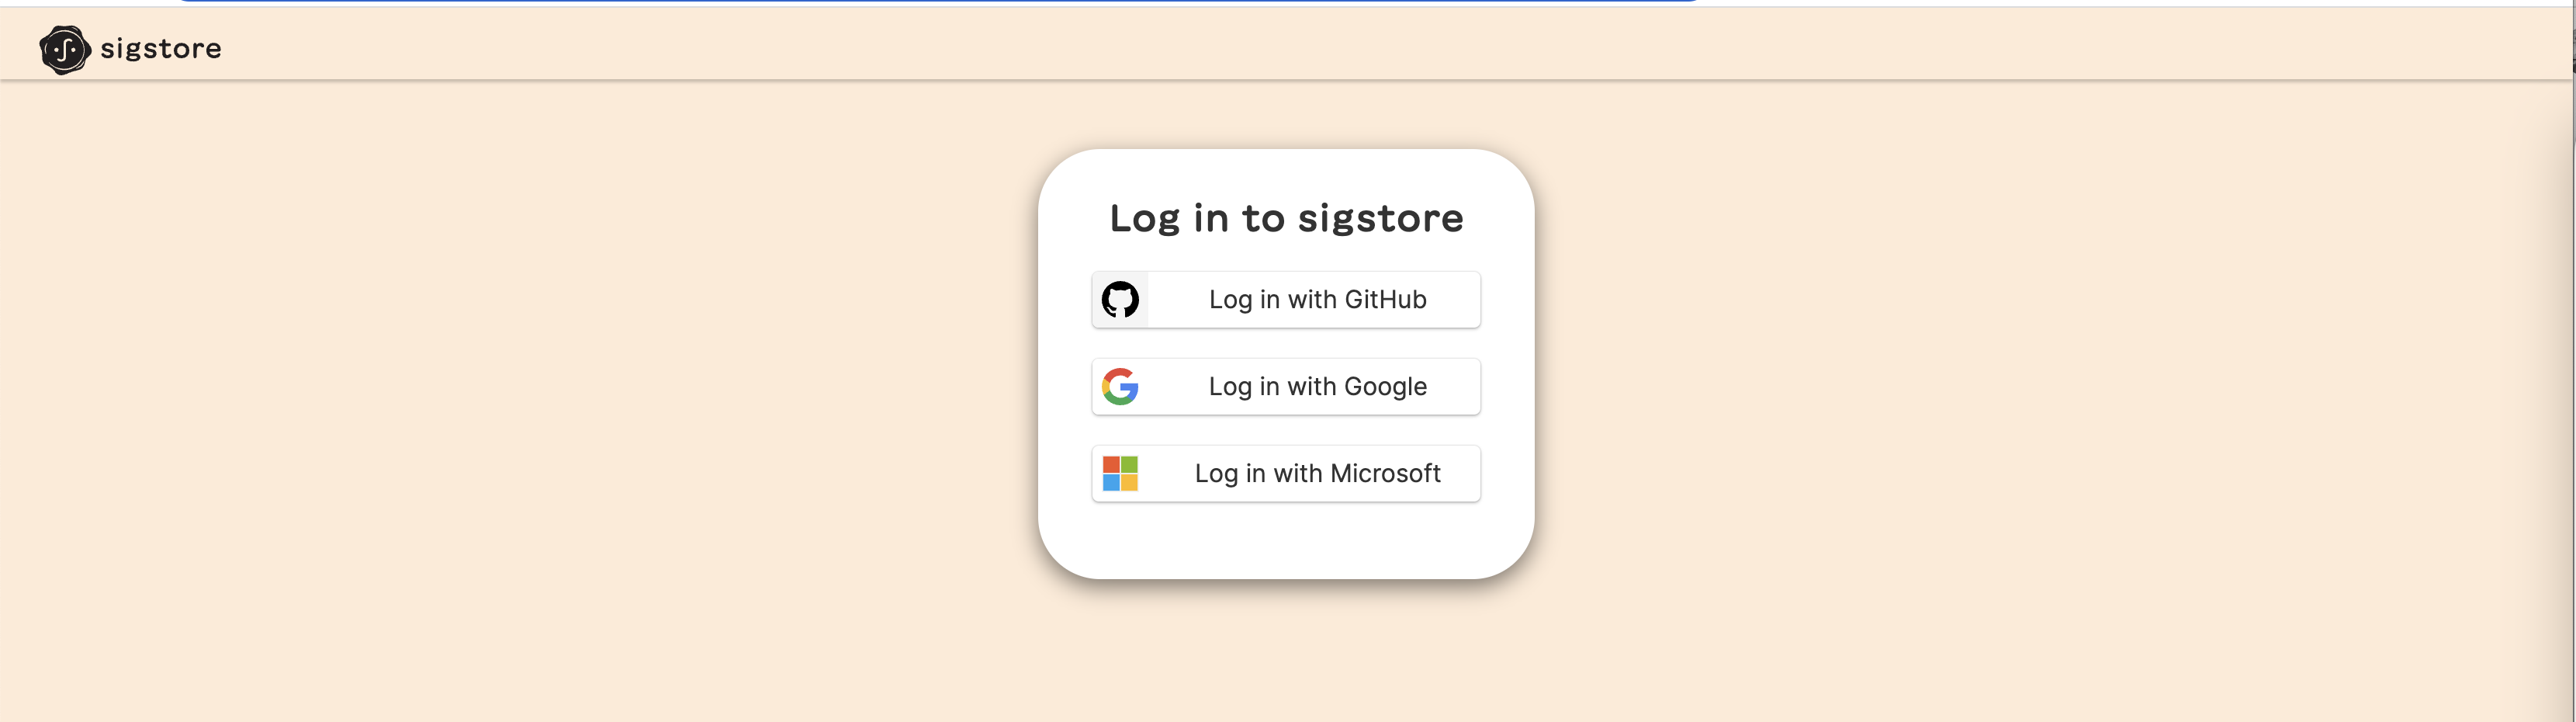
But the catch of using keyless mode is, it requires OIDC (Open ID Connect) to associate our identity to the X.509 certificate it generates; this is to attest the signer of the artifact which we can later verify. And the certificate is pushed to a public append-only log Rekor, where our identity will be available. Identity can be an email or pipeline ID which we and our team can verify is authentic and trust. For OIDC, it currently supports:
Microsoft
GitHub
Let’s create a new zip from the existing zip and call it artifact-keyless.zip (or choose any file to your liking). For this demo, SHA is different for both of the zips created.
zip -r artifact-keyless.zip artifact.zip

shasum -a 256 artifact.zip | awk '{print $1}'

shasum -a 256 artifact-keyless.zip | awk '{print $1}'

To sign in the keyless mode we just have to run the following command:
cosign sign-blob artifact-keyless.zip

# OR
# sign-blob and generate a bundle containing X.509 ceritifcate and signature.
cosign sign-blob artifact-keyless.zip --bundle cosign.bundle

Press y on the prompt. Then a browser tab will open for the OIDC verification. This is the identity verification step for the Certificate Authority (CA) before creating our digital certificate.
We need to select one of the OIDC providers, and once the authentication is successful, we’ll see a similar message as shown below.

You can notice that it has generated an ephemeral certificate which is only valid for 10 mins.
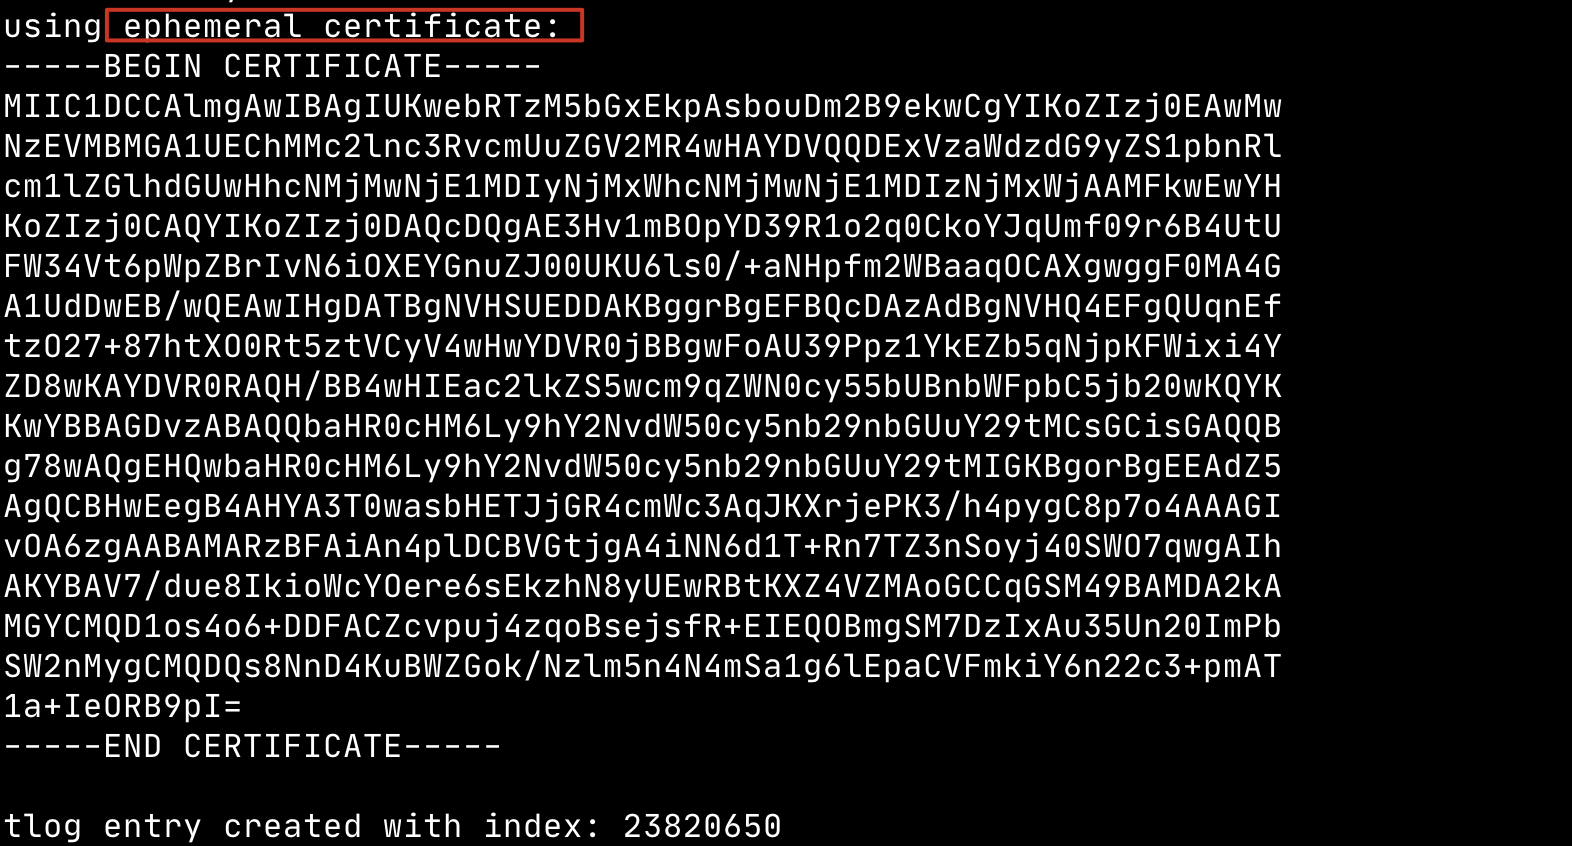
Cosign generated a private key in memory and then a public key out of that. The private key never touches the physical storage.
It generated the SHA of our artifact and signed it generating a signature.
It then communicated with the Certificate Authority (CA) Flucio to bind its identity with the public key on an X.509 certificate.
For identity proofing, we were prompted for OIDC.
Once we verify our identity, it receives the OIDC token.
It took the public key, signature and OIDC token to the Fulcio Certificate Authority.
the CA created an X.509 certificate which binds our public key with our identity, along with the signature of the signed artifact.
CA signed that certificate with its Private Key and pushed the certificate details to the Rekor Transparency log.
See a lot of things happened in the background, but when we were using it; it was frictionless! It is one of the benefits of keyless signing with cosign. 🤩
Like before, on the output we have received the index of our Rekor log. Let’s take that log index and see the details of our artifact.
rekor-cli get --log-index <your-log-index>
The output is of the same format as before. But we should notice that the size of publicKey > content is bigger than before. In the private-public key mode, we were using our public key and its size was small, but now it holds the X.509 certificate generated by Flucio.
Let’s see what our certificate looks like; the content is Base64 encoded, we should first decode it and save it to a file called artifact-keyless.crt:
rekor-cli get --log-index <rekor-log-index> --format json | jq -r .Body.HashedRekordObj.signature.publicKey.content | base64 -D > artifact-keyless.crt
Now, let’s use a tool called step to view our certificate. You can download it here.
step certificate inspect artifact-keyless.crt --format json
It will generate a huge JSON, if you search for your email address you can find it in the subject_alt_name section.
step certificate inspect artifact-keyless.crt --format json | jq .extensions.subject_alt_name

Now we have the X.509 certificate, how do we make sure that the Fulcio Certificate Authority has issued it?
Well, our X.509 certificate has been signed with the private key from Fulcio and we can use its public key to verify them. The Root Certificate and Intermediate Certificate for Fulcio is available here. You can download them and save them to a file called chain.crt or any name you prefer.
You can also find a copy of it here, but it's best if you download it from the official sources 😉
    -----BEGIN CERTIFICATE-----
    MIICGjCCAaGgAwIBAgIUALnViVfnU0brJasmRkHrn/UnfaQwCgYIKoZIzj0EAwMw
    KjEVMBMGA1UEChMMc2lnc3RvcmUuZGV2MREwDwYDVQQDEwhzaWdzdG9yZTAeFw0y
    MjA0MTMyMDA2MTVaFw0zMTEwMDUxMzU2NThaMDcxFTATBgNVBAoTDHNpZ3N0b3Jl
    LmRldjEeMBwGA1UEAxMVc2lnc3RvcmUtaW50ZXJtZWRpYXRlMHYwEAYHKoZIzj0C
    AQYFK4EEACIDYgAE8RVS/ysH+NOvuDZyPIZtilgUF9NlarYpAd9HP1vBBH1U5CV7
    7LSS7s0ZiH4nE7Hv7ptS6LvvR/STk798LVgMzLlJ4HeIfF3tHSaexLcYpSASr1kS
    0N/RgBJz/9jWCiXno3sweTAOBgNVHQ8BAf8EBAMCAQYwEwYDVR0lBAwwCgYIKwYB
    BQUHAwMwEgYDVR0TAQH/BAgwBgEB/wIBADAdBgNVHQ4EFgQU39Ppz1YkEZb5qNjp
    KFWixi4YZD8wHwYDVR0jBBgwFoAUWMAeX5FFpWapesyQoZMi0CrFxfowCgYIKoZI
    zj0EAwMDZwAwZAIwPCsQK4DYiZYDPIaDi5HFKnfxXx6ASSVmERfsynYBiX2X6SJR
    nZU84/9DZdnFvvxmAjBOt6QpBlc4J/0DxvkTCqpclvziL6BCCPnjdlIB3Pu3BxsP
    mygUY7Ii2zbdCdliiow=
    -----END CERTIFICATE-----
    -----BEGIN CERTIFICATE-----
    MIIB9zCCAXygAwIBAgIUALZNAPFdxHPwjeDloDwyYChAO/4wCgYIKoZIzj0EAwMw
    KjEVMBMGA1UEChMMc2lnc3RvcmUuZGV2MREwDwYDVQQDEwhzaWdzdG9yZTAeFw0y
    MTEwMDcxMzU2NTlaFw0zMTEwMDUxMzU2NThaMCoxFTATBgNVBAoTDHNpZ3N0b3Jl
    LmRldjERMA8GA1UEAxMIc2lnc3RvcmUwdjAQBgcqhkjOPQIBBgUrgQQAIgNiAAT7
    XeFT4rb3PQGwS4IajtLk3/OlnpgangaBclYpsYBr5i+4ynB07ceb3LP0OIOZdxex
    X69c5iVuyJRQ+Hz05yi+UF3uBWAlHpiS5sh0+H2GHE7SXrk1EC5m1Tr19L9gg92j
    YzBhMA4GA1UdDwEB/wQEAwIBBjAPBgNVHRMBAf8EBTADAQH/MB0GA1UdDgQWBBRY
    wB5fkUWlZql6zJChkyLQKsXF+jAfBgNVHSMEGDAWgBRYwB5fkUWlZql6zJChkyLQ
    KsXF+jAKBggqhkjOPQQDAwNpADBmAjEAj1nHeXZp+13NWBNa+EDsDP8G1WWg1tCM
    WP/WHPqpaVo0jhsweNFZgSs0eE7wYI4qAjEA2WB9ot98sIkoF3vZYdd3/VtWB5b9
    TNMea7Ix/stJ5TfcLLeABLE4BNJOsQ4vnBHJ
    -----END CERTIFICATE-----
Let’s verify our X.509 certificate.
If we are validating the certificate within 10 mins of signing then we can use the following command:
openssl verify -CAfile chain.crt artifact-keyless.crt
If we are trying to validate the certificate, beyond 10 mins then we should use the following command, to skip checking time in order to validate the overall certificate:
openssl verify -no_check_time -CAfile chain.crt artifact-keyless.crt
Now that we have verified that the certificate is signed by the root CA. Let’s move into verifying our artifact. For this, we will also require the signature of our artifact. We can grab it from the signature > content section from the output of the rekor cli. And we can store it in a file called artifact-keyless.sig
rekor-cli get --log-index <index-number> --format json | jq -r .Body.HashedRekordObj.signature.content > artifact-keyless.sig
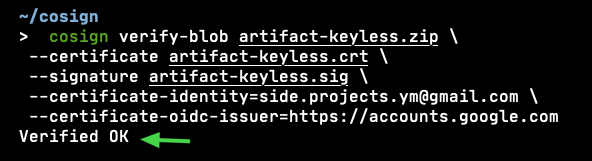
With that in place, let’s use the following command where we pass the certificate, signature, certificate identity and certificate OIDC issuer to verify our artifact.
cosign verify-blob artifact-keyless.zip \
 --certificate artifact-keyless.crt \
 --signature artifact-keyless.sig \
 --certificate-identity=<your-email-address> \
 --certificate-oidc-issuer=https://accounts.google.com

# OR
# If you have generated the cosign.bundle when signing the artifact, you can you that bundle to replace certificate and signature, as the bundle contains both of these.

cosign verify-blob artifact-keyless.zip \
 --bundle cosign.bundle \
 --certificate-identity=<your-email-address> \
 --certificate-oidc-issuer=https://accounts.google.com
If we have got all the things right then we should get the “Verified OK” message, else we’ll get an error.
Artifact signing and verification have become one of crucial steps in securing our infrastructure against supply chain attacks. Project Sigstore has provided us with the tools and infrastructure to do this with minimal effort. If you are not signing your artifacts then it’s high time you start doing so!